Creating game for android using JavaScript #2 | Drawing game objects
We have updated this text for you!
Update date: 16.12.2024
Author of the update: Mateusz Machnio
Few years ago, when Android had taken lead of the mobile market, I had decided to create game and become a millionaire as a “thousands” of mobile game developers.
Clearing canvas
In HTML5 scene has to be redraw at each time. Clearing canvas is fundamentally important operation, and also have influence on performance.
clear () {

        let {ctx, width, height} = this;

        ctx.fillStyle = '#94c0e6';

        ctx.fillRect(0, 0, width, height);

 }
Clear method is called within draw method, just before all game objects will be painted. For our case it will be used to draw beautiful, clear blue sky! fillRect(0, 0, width, height); it is all what we need to this purpose. But if sky is not needed, there are other options to clear our canvas. clearReact method should be little bit faster. Also little hack: resetting canvas width works, and on some browsers it has better performance than clearing it by drawing rectangles.
Drawing on canvas
Each game has to have gameplay. Flappy Bird environment consist of movable obstacles which gamer is trying to avoid. To draw our obstacles we can use simple, colorful rectangles. We have to use also little bit of randomness to generate space between top and bottom of obstacle. Create new js file obstacle.js with Obstacle class. We will use reset method to generate new obstacle each time our FlappyBird will overtake it, and this obstacle will reach the end of the screen and disappear in the background.
reset () {

   let {config} = this;

   let space = this.getRandomInt (config.obstacle.minSpace, config.obstacle.maxSpace);

   this.x = config.width + config.width / 2;

   this.top = this.getRandomInt (0, config.height - space);

   this.bottom = this.top + space;

}
Obstacle space is generated. Let’s draw it on canvas. rect(x, y , width, height) method draws rectangle filled with color set by fillStyle parameter.
reset () {

   let {config} = this;

   let space = this.getRandomInt (config.obstacle.minSpace, config.obstacle.maxSpace);

   this.x = config.width + config.width / 2;

   this.top = this.getRandomInt (0, config.height - space);

   this.bottom = this.top + space;

}
Now it is possible to create update method with modifier as parameter (how much time passed since the last render) to move obstacle through the screen. Each render call will also call update method. We move obstacle by the delta defined in config object, limited by modifier parameter. It ensures that gameplay will be regular, independently from the FPS rate.
update (modifier) {

        let {x, width, config} = this;

        this.x = x - (this.config.obstacle.speed / modifier);

        if (this.x + width < 0) {

            this.reset();

        }

  }
Next step is to create Obstacle objects in Game class. Separate method will be good to do that. For our purpose three obstacles will be enough. At the eginning they should be placed in different positions. First one starts from the half of the screen with. Second obstacle at the end of the screen and the last one, on the half after the screen.
createGameElements () {

        let {config, ctx} = this;


        //obstacles

        let o1 = new Obstacle(config, ctx);

        let o2 = new Obstacle(config, ctx);

        let o3 = new Obstacle(config, ctx);


        o1.setPosition(config.width / 2);

        o2.setPosition(config.width);

        o3.setPosition(config.width + config.width / 2);


        this.obstacles = [o1, o2, o3];

   }
Result is visible below. Obstacles are moving from the right side of the screen to the left. When the first of them reaches the left edge of the screen, and it disappears behind it, then reset method generate its new “appearance”, and obstacle is placed at the end (width and a half of screen width)

Sprites and Animations
It is possible to display animated object. We can achieve this by fast switching frames, like in the movie. This is our hero sprite. It consists of three little bit different frames.

I replaced original FlappyBird by true hero found somewhere on the web. I’ve just created additional two frames, for animation purpose.
It’s time to create Flappy class for our hero object. Create new js file for it, flappy.js. To load image we have to create Image object, and set relevant src path to our sprite.
this.image = new Image();

this.image.src = "sprites/flappy.png";
It is also possible to set callback “onload” method. It can be useful to create and update loading indicator, while loading large amount of resources. In our case it will be not necessary.
To switch between frames we have to use currentFrame flag. We calculate it within update method. Because it is called relay often, it is necessary to limit frame switch by another frameSpeed flag. Adjust this parameter for acceptable results.
update (modifier) {

        this.frameInterval++;

        if (this.frameInterval > this.frameSpeed) {

            this.currentFrame++;

            if( this.currentFrame > 2) {

                this.currentFrame = 0 ;

            }

            this.frameInterval = 0;

        }

    }
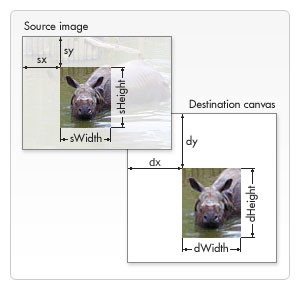
How to draw our animated hero? CanvasRenderingContext2D.drawImage() method of the Canvas 2D API provides different ways to draw an image onto the canvas. For our purpose we will use the most parametrized one.
void ctx.drawImage(image, sx, sy, sWidth, sHeight, dx, dy, dWidth, dHeight);
Parameters of this method are really good explained by the picture. In Flappy’s draw method, the second parameter is dynamically calculated by currentFrame parameter.
ctx.drawImage(this.image,

          imageSize * currentFrame,

 0, imageSize, imageSize,

x, y, width, height )
Now Flappy Hero is fully animated and it can fly!
Read also: What is Rest API vs SOAP!
Meet the geek-tastic people, and allow us to amaze you with what it's like to work with j‑labs!
Contact us


