Atlas Search
Introduction
If an application has some kind of search functionalities with a modern like and feel it usually has functionalities such as:
- fuzzy matching (typo tolerance)
- highlighting
- facets
- scoring / weighting
- synonyms
- autocomplete
So these are the functionalities that usually power a modern search bar. All the above-mentioned functionalities are not available in traditional transactional databases.
So how is it usually done? First we have a traditional transactional database which have lots of functionalities typical for such databases (CRUD, change streams, aggregations, secondary indexes and others). And then we need to add a separate search engine – so we need a separate data store. Good examples can be Elasticsearch, Solr. They are based on an Apache project called Lucene project which is a Java-based library that allows the creation of inverted indexes. We need both these mechanisms to work together, so we have to keep data stored in both of them to be in sync. This can provide quite a lot of overhead.
Atlas offers a unifying database and search. In Atlas, we have a traditional transactional database and an integrated functionality of the search engine.
Atlas Search – What is it?
Atlas Search is an embedded full-text search in MongoDB Atlas that gives you a seamless, scalable experience for building relevance-based app features. Atlas Search is built on Apache Lucene and eliminates the need to run a separate search system alongside your database. It simplifies data architecture, you don’t need to worry about synchronization, and it is a fully managed platform offered as one product.
How to run queries against Atlas Search Index?
Let’s analyze a movies collection in sample_movies db with the following schema:
{
  _id: ObjectId,
  title: String,
  year: Int
  runtime: Int
  released: Date
  plot: String
  lastUpdated: Date
  type: String,
  directors: String[],
  countries: String[]
}
Step 1 – Create an index
You can create the Atlas Search index for collections on your Atlas cluster through the Atlas UI, MongoDB Atlas Administration API, Atlas CLI, and Terraform. As this is a start-up example we will create Atlas Search Index using the Atlas UI with all the default settings.

a. Navigate to the Atlas Cluster Overview page and click your cluster name
b. Click the Search tab
c. Click Create Search Index
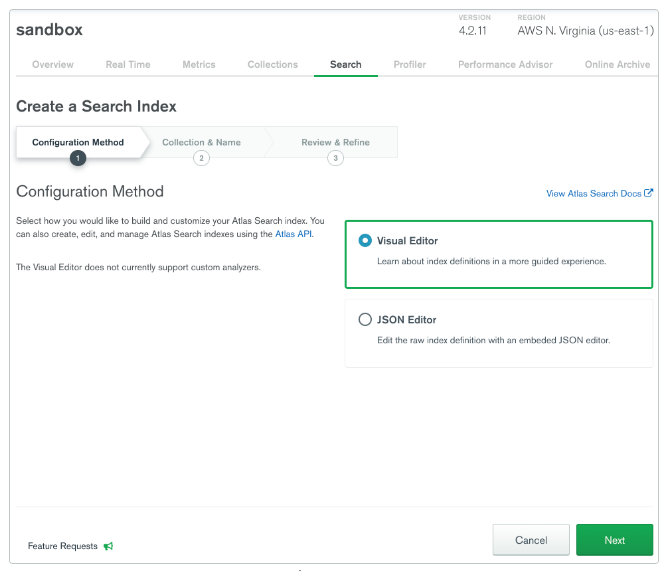
d. Select Configuration Method → for first the time I suggest Visual Editor → and click Next
e. Enter the Index Name, and set the Database and Collection
(the default index name is default – you can leave the default name, and then you do not need to specify the index name when writing your query)
f. Review the default Atlas Search index configuration settings in the Index Configurations section – and for the time being we will leave all the default settings
g. Click Create Search Index
h. Close the You’re All Set! Modal Window
i. Check the status
The newly created index appears on the Search tab. While the index is building, the Status field reads Build in Progress. When the index is has finished building, the Status field reads Active.
When creating the index with all the default settings the index definition should look as follows:
{
    "mappings": {
        "dynamic": true
    }
}
You can create an Atlas Search index that uses dynamic mappings or static mappings. The default dynamic mappings mean that Atlas Search automatically indexes the fields of supported types in each document. Dynamically mapped indexes occupy more disk space than statically mapped indexes and may be less performant. However, for experimenting with Atlas Search it is a very good option.
Step 2 – Run Atlas Search Queries
Connect to your cluster in a MongoDB Shell or find Search Tester when clicking on your index name in Atlas. Write the following query:
db.movies.aggregate([
  {
    $search: {
      "text": {
        "query": "baseball",
        "path": "plot"
      }
    }
  },
  {
    $limit: 5
  },
  {
    $project: {
      "_id": 0,
      "title": 1,
      "plot": 1
    }
  }
])
The following query searches for the word “baseball” in the plot field. It includes a $limit stage to limit the output to 5 results and a $projectstage to exclude all the fields except the title and plot.
Let’s analyze a bit more advanced example:
$search has several operators for constructing different types of queries. One of the most popular is the compound operator – it combines several operators into a single query. It has the following syntax:
{
  $search: {
    "index": <index name>, // optional, defaults to "default"
    "compound": {
      <must | mustNot | should | filter>: [ { <clauses> } ],
      "score": <options>
    }
  }
}
must – maps to the AND boolean mustNot – maps to the AND NOT boolean operator
Let’s write the query with the following search criteria:
- The plot field must contain either Hawaii or Alaska.
- The plot field must contain a four-digit number, such as a year.
- The title field must not contain Beach or Snow.
db.movies.aggregate([
  {
    $search: {
      "compound": {
        "must": [ {
          "text": {
            "query": ["Hawaii", "Alaska"],
            "path": "plot"
          },
        },
        {
          "regex": {
            "query": "([0-9]{4})",
            "path": "plot",
            "allowAnalyzedField": true
          }
        } ],
        "mustNot": [ {
          "text": {
            "query": ["Beach", "Snow"],
            "path": "title"
          }
        } ]
      }
    }
  },
  {
    $project: {
      "title": 1,
      "plot": 1,
      "_id": 0
    }
  }
])
Summary
As you can see getting started with Atlas Search is very easy. If you are already using MongoDB and know how to write Aggregation Pipelines then creating queries consuming Atlas Search is no different as it comes as a $search aggregation pipeline stage. The examples above are only to get you started but with such a basis you can go and play with Atlas Search to try out all the cool advanced search features.
References
- https://www.mongodb.com/docs/atlas/atlas-search/atlas-search-overview/
- https://www.mongodb.com/docs/atlas/atlas-search/create-index/
- https://www.mongodb.com/docs/atlas/atlas-search/tutorial/
- https://www.mongodb.com/docs/atlas/atlas-search/tutorial/run-query/
Check out our article about Angular Signal change detection!
Meet the geek-tastic people, and allow us to amaze you with what it's like to work with j‑labs!
Contact us


