AWS EKS Auto Mode
Introduction
Re:Invent 2024 belongs to history. And what history it is, I tell you! Amazon announced dozens of new features for the AWS Cloud, many of them are great and really exciting! But there is one that beats the others in my opinion – it is EKS Auto Mode. In this article I would like to tell you a bit about this feature.
Features and benefits of EKS Auto Mode
The first and foremost feature of EKS Auto Mode is taking all the burden related to maintaining EKS Clusters away.
Based on the example currently available at EKS Pricing page, the cost if this feature is 12% of your overall instances cost. Amazon mentions $1,046.82 for EC2 instances per month and a $125.62 EKS Auto Mode fee for these instances in their example. The complete example is available here.
So what do we get for that 12% fee?
- Automated patching and updates of EC2 instances within the Cluster
- Autoscaling thanks to integration with Karpenter
- Scaling cluster to zero!
- Cost optimization without compromising flexibility
- Security improvements due to integrations with AWS security services
- Maintenance burden reduced
- Easy start with EKS! Entry level is much lower now!
- Automated storage, networking and IAM management
All the details are available in the official documentation. There’s also the How it works section that explains the management of the instances, IAM and networking using the EKS Auto Mode.
Easy start and maintenance
EKS Auto Mode co-operates with Karpenter and manages a subset of the cluster add-ons. With that we don’t need to worry about proper maintaining and scaling nodes and core components, e.g. CoreDNS (I was involved in this one in the past, it is a pain!). It also abstracts away dependencies’ management between addons, version upgrades or even the whole Cluster upgrade! The last one opens a nice path to automatically upgrading clusters instead of paying for the extended support which is ca. $440 (instead of the regular price of $70) per cluster – imagine having 15 clusters on extended support – $6,600 per month (instead of the regular price of $1050)! This is a lot! And why is extended support so costly? Because managing different and old EKS versions, and supporting them is hard and expensive – and Amazon knows that very well!
But I mentioned EKS Auto Mode costs ca. at 12% of the instances price in the cluster. This sounds not much if we have small clusters, but for big clusters it will become costly. Should we then always use EKS Auto Mode? Certainly not! If you have expertise on board and don’t need to hire new people just because of EKS or you have big clusters that will raise the total cost of the EKS Auto Mode much, then it’s better to go the classic way. The math is yet on your side; you choose which is better – pay AWS for their expertise or pay your engineers. Keep in mind that engineers can do other work when they don’t have to manage clusters – think of alternative costs, perhaps they can bring more value to the company than you would save on not using the EKS Auto Mode.
Security features
The EKS Auto Mode supports multiple features and mechanisms around security. It integrates Kubernetes API with EKS access entries that are integrated with AWS IAM users and roles. This allows us to have fine-grained access to the K8s API leveraging EKS access entries.
There are also features around networking security. The EKS Auto Mode supports strong VPC integration, operating without VPC bounds, supporting custom VPCs with their configs and private networking among the components of the cluster. Kubernetes Network Policies are also supported in this mode, allowing users to define custom network traffic rules, which meets the most demanding enterprise requirements.
Another set of security features in the EKS Auto Mode is connected with EC2 security. The EKS Auto Mode has a maximum 21 days lifetime for instances, so you won’t be running unpatched instances (as it also manages patching of the instances) and in the case there’s anything unwanted in the instance, it will be regularly replaced. EC2 storage in this mode is encrypted – all disks created with the instances will be protected. But this has one consideration to be aware of – custom EBSes managed within Kubernetes using its persistent storage configuration, are not fully managed with the EKS Auto Mode and you need to remember about that!
EC2 instances in this mode are not accessible at all – neither SSH nor SSM access is available. If you need to access EC2 instances in your clusters for whatever reason, you need to manage EKS clusters on your own for each cluster that has these access requirements. But if you have such needs, I can bet you understand what you are doing well enough to be able to manage clusters on your own – the EKS Auto Mode is mostly to help you, not to cover every specific corner case for you.
An important note! The EKS Auto Mode uses AMIs that are specifically crafted for this mode! If your company policies require cluster instances to meet some very specific security features, then this mode is not for you, and you are on your own! What I can recommend here is assessing the provided AMIs carefully in details with your security teams to ensure if they can be used or not – and ensure the team members gained knowledge about these AMIs if they forbid using the AMIs, so the justification is not just “we have our standards” or “we don’t know these AMIs”.
Let’s play with it then!
Environment prerequisites
To follow this guide you will need the following tools:
- AWS CLI
- Terraform
- kubectl
- helm
- aws-vault (optional)
And the following entities:
- AWS Account
- IAM User
- IAM Role (optional)
- Administrator Access AWS managed policy (for easy PoC)
If you want to try it out privately and are not familiar with AWS, be ready for costs – resources and services used here may not be eligible for AWS Free Tier.
Playground configuration
To see the EKS Auto Mode in action let’s configure the basic cluster and use it!
First let’s configure the EKS cluster with Terraform.
For this I have used official Terraform docs on eks_cluster and added additional configuration for my IAM user to be able to interact with the cluster. I have also used the local Terraform state, as I didn’t want to configure the remote backend just for the PoC that I knew I will remove shortly after experimenting.
See the following Terraform configuration I have prepared:
terraform.tf
terraform {
  required_providers {
    aws = {
      source  = "hashicorp/aws"
      # Amazon EKS Auto Mode support was added in version 5.79
      version = ">= 5.79"
    }
  }
}
providers.tf
provider "aws" {
  # Instances in Ireland are cheaper than in Frankfurt.
  # You can check costs e.g. at https://instances.vantage.sh/
  region = "eu-west-1"
  default_tags {
    tags = {
      Terraform   = "true"
      Environment = "eks-auto-mode-poc"
    }
  }
}
data.tf
data "aws_region" "current" {}

# I added my user to the EKS cluster, as it was not included in the example from Terraform docs.
data "aws_iam_user" "jan_tyminski" {
  user_name = "jan.tyminski@j-labs.pl"
}
vpc.tf
# I didn’t want to put a lot of effort in it so I used the official module from the Terraform registry.
# This is the module supported by Anton Babenko and his modules are well maintained and well tested.
module "jlabs_eks_poc_vpc" {
  source = "terraform-aws-modules/vpc/aws"

  name = "jlabs-eks-poc"
  cidr = "10.0.0.0/16"

  azs             = ["eu-west-1a", "eu-west-1b", "eu-west-1c"]
  private_subnets = ["10.0.1.0/24", "10.0.2.0/24", "10.0.3.0/24"]
  public_subnets  = ["10.0.101.0/24", "10.0.102.0/24", "10.0.103.0/24"]

  enable_nat_gateway = true
  enable_vpn_gateway = false
  # single nat gateway is used to reduce costs of the PoC
  single_nat_gateway = true
}
eks.tf
resource "aws_eks_cluster" "jlabs_eks_poc" {
  name = "jlabs_eks_poc"

  access_config {
    authentication_mode = "API"
  }

  role_arn = aws_iam_role.jlabs_eks_poc_cluster.arn
  version  = "1.31"

  bootstrap_self_managed_addons = false

  # compute_config block is required for EKS Auto Mode, with enabled = true
  compute_config {
    enabled       = true
    node_pools    = ["general-purpose"]
    node_role_arn = aws_iam_role.jlabs_eks_poc_node.arn
  }

  kubernetes_network_config {
    elastic_load_balancing {
      enabled = true
    }
  }

  storage_config {
    block_storage {
      enabled = true
    }
  }

  vpc_config {
    endpoint_private_access = true
    endpoint_public_access  = true

    subnet_ids = module.jlabs_eks_poc_vpc.private_subnets
  }

  # Ensure that IAM Role permissions are created before and deleted
  # after EKS Cluster handling. Otherwise, EKS will not be able to
  # properly delete EKS managed EC2 infrastructure such as Security Groups.
  depends_on = [
    aws_iam_role_policy_attachment.cluster_AmazonEKSClusterPolicy,
    aws_iam_role_policy_attachment.cluster_AmazonEKSComputePolicy,
    aws_iam_role_policy_attachment.cluster_AmazonEKSBlockStoragePolicy,
    aws_iam_role_policy_attachment.cluster_AmazonEKSLoadBalancingPolicy,
    aws_iam_role_policy_attachment.cluster_AmazonEKSNetworkingPolicy,
  ]
}
eks_roles.tf
resource "aws_iam_role" "jlabs_eks_poc_node" {
  name = "eks_auto_mode-jlabs_eks_poc-node-role"
  assume_role_policy = jsonencode({
    Version = "2012-10-17"
    Statement = [
      {
        Action = ["sts:AssumeRole"]
        Effect = "Allow"
        Principal = {
          Service = "ec2.amazonaws.com"
        }
      },
    ]
  })
}

resource "aws_iam_role_policy_attachment" "node_AmazonEKSWorkerNodeMinimalPolicy" {
  policy_arn = "arn:aws:iam::aws:policy/AmazonEKSWorkerNodeMinimalPolicy"
  role       = aws_iam_role.jlabs_eks_poc_node.name
}

resource "aws_iam_role_policy_attachment" "node_AmazonEC2ContainerRegistryPullOnly" {
  policy_arn = "arn:aws:iam::aws:policy/AmazonEC2ContainerRegistryPullOnly"
  role       = aws_iam_role.jlabs_eks_poc_node.name
}

resource "aws_iam_role" "jlabs_eks_poc_cluster" {
  name = "eks_auto_mode-jlabs_eks_poc-cluster-role"
  assume_role_policy = jsonencode({
    Version = "2012-10-17"
    Statement = [
      {
        Action = [
          "sts:AssumeRole",
          "sts:TagSession"
        ]
        Effect = "Allow"
        Principal = {
          Service = "eks.amazonaws.com"
        }
      },
    ]
  })
}

resource "aws_iam_role_policy_attachment" "cluster_AmazonEKSClusterPolicy" {
  policy_arn = "arn:aws:iam::aws:policy/AmazonEKSClusterPolicy"
  role       = aws_iam_role.jlabs_eks_poc_cluster.name
}

resource "aws_iam_role_policy_attachment" "cluster_AmazonEKSComputePolicy" {
  policy_arn = "arn:aws:iam::aws:policy/AmazonEKSComputePolicy"
  role       = aws_iam_role.jlabs_eks_poc_cluster.name
}

resource "aws_iam_role_policy_attachment" "cluster_AmazonEKSBlockStoragePolicy" {
  policy_arn = "arn:aws:iam::aws:policy/AmazonEKSBlockStoragePolicy"
  role       = aws_iam_role.jlabs_eks_poc_cluster.name
}

resource "aws_iam_role_policy_attachment" "cluster_AmazonEKSLoadBalancingPolicy" {
  policy_arn = "arn:aws:iam::aws:policy/AmazonEKSLoadBalancingPolicy"
  role       = aws_iam_role.jlabs_eks_poc_cluster.name
}

resource "aws_iam_role_policy_attachment" "cluster_AmazonEKSNetworkingPolicy" {
  policy_arn = "arn:aws:iam::aws:policy/AmazonEKSNetworkingPolicy"
  role       = aws_iam_role.jlabs_eks_poc_cluster.name
}

# I added my user to the EKS cluster, as it was not included in the example from Terraform docs.

resource "aws_eks_access_entry" "jan_tyminski" {
  cluster_name  = aws_eks_cluster.jlabs_eks_poc.name
  principal_arn = data.aws_iam_user.jan_tyminski.arn
  type          = "STANDARD"
}

resource "aws_eks_access_policy_association" "jan_tyminski_AmazonEKSAdminPolicy" {
  cluster_name  = aws_eks_cluster.jlabs_eks_poc.name
  policy_arn    = "arn:aws:eks::aws:cluster-access-policy/AmazonEKSAdminPolicy"
  principal_arn = aws_eks_access_entry.jan_tyminski.principal_arn

  access_scope {
    type = "cluster"
  }
}

resource "aws_eks_access_policy_association" "jan_tyminski_AmazonEKSClusterAdminPolicy" {
  cluster_name  = aws_eks_cluster.jlabs_eks_poc.name
  policy_arn    = "arn:aws:eks::aws:cluster-access-policy/AmazonEKSClusterAdminPolicy"
  principal_arn = aws_eks_access_entry.jan_tyminski.principal_arn

  access_scope {
    type = "cluster"
  }
}
eks_outputs.tf
# Outputs in this PoC are not necessary, but I will add them for the sake of completeness
# and have commands to update kubeconfig and describe the cluster ready for me.

output "eks_cluster_name" {
  value = aws_eks_cluster.jlabs_eks_poc.name
}

output "eks_cluster_region" {
  value = data.aws_region.current.name
}

output "update_kubeconfig" {
  value = "aws eks --region ${data.aws_region.current.name} update-kubeconfig --name ${aws_eks_cluster.jlabs_eks_poc.name}"
}

output "describe_cluster" {
  value = "aws eks --region ${data.aws_region.current.name} describe-cluster --name ${aws_eks_cluster.jlabs_eks_poc.name}"
}
Now we can run terraform apply, review the resources to be created and confirm their creation. After a couple of minutes - let's say 15 - we should have our cluster ready.

In the meantime make yourself a coffee, tea or some other beverage, take time to talk with someone or to make some quick exercises - breaks are important to keep your brain rested and work properly.

Set a timer for 15 minutes to check if everything is ready to continue - if not, take 5-10 more minutes with another timer.

Or just go to lunch and everything should be ready when you return.
Setting up access to the cluster
Now, when the cluster is set up, we can configure kubectl with this new cluster.
For me it required to run:
aws eks --region eu-west-1 update-kubeconfig --name jlabs_eks_pocFor you – check your terraform outputs – the command should be constructed there for you!
To see if everything works, run:
kubectl get nodesAt this point you should get the information that no nodes were found – which is fine, this is the feature of the EKS Auto Mode – we can scale the cluster to zero!
Testing Amazon EKS Auto Mode
When everything is ready, we can now continue working with the Kubernetes resources.
There’s a more verbose guide available at AWS Blog, but I did it a bit differently, using a shorter method, to see the scaling works. You can of course follow the official guide on that – I am not generating the actual load on the deployments, but just scale replicas for one of them.
So let’s configure the values file:
values.yaml
catalog:
  mysql:
    secret:
      create: true
      name: catalog-db
      username: catalog
    persistentVolume:
      enabled: true
      accessMode:
        - ReadWriteOnce
      size: 30Gi
      storageClass: eks-auto-ebs-csi-sc

ui:
  endpoints:
    catalog: http://retail-store-app-catalog:80
    carts: http://retail-store-app-carts:80
    checkout: http://retail-store-app-checkout:80
    orders: http://retail-store-app-orders:80
    assets: http://retail-store-app-assets:80
  autoscaling:
    enabled: true
    minReplicas: 5
    maxReplicas: 10
    targetCPUUtilizationPercentage: 80
  topologySpreadConstraints:
  - maxSkew: 1
    topologyKey: topology.kubernetes.io/zone
    whenUnsatisfiable: ScheduleAnyway
    labelSelector:
      matchLabels:
        app: ui
  - maxSkew: 1
    topologyKey: kubernetes.io/hostname
    whenUnsatisfiable: ScheduleAnyway
    labelSelector:
      matchLabels:
        app: ui
  ingress:
    enabled: true
    className: eks-auto-alb
And run:
helm install -f values.yaml retail-store-app oci://public.ecr.aws/aws-containers/retail-store-sample-chart --version 0.8.3Then check if all the deployments are ready:
kubectl wait --for=condition=available deployments --allAnd in a separate terminal you can run
kubectl get nodes --watch
NAME                  STATUS   ROLES    AGE   VERSION
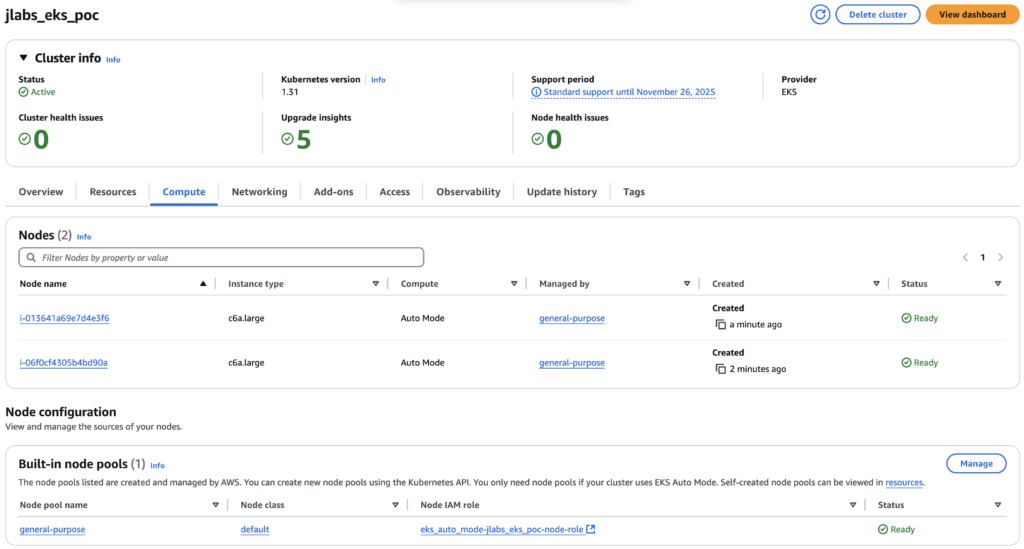
i-013641a69e7d4e3f6   Ready    <none>   35s   v1.31.1-eks-1b3e656
i-06f0cf4305b4bd90a   Ready    <none>   49s   v1.31.1-eks-1b3e656
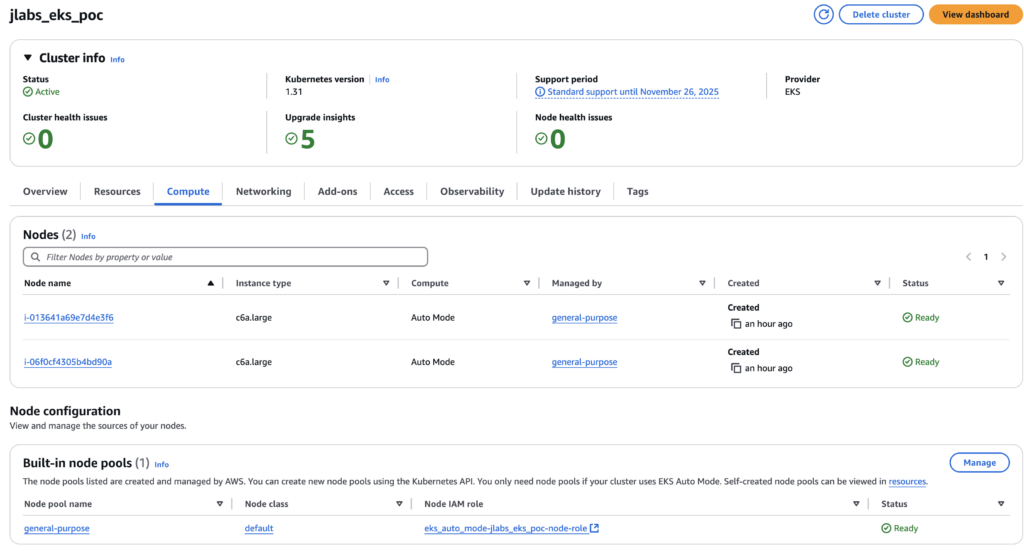
This is what it looks in the AWS Console:

kubectl get nodes
NAME                  STATUS   ROLES    AGE   VERSION
i-0125aff84e741bb4c   Ready    <none>   81s   v1.31.1-eks-1b3e656
i-013641a69e7d4e3f6   Ready    <none>   78m   v1.31.1-eks-1b3e656
i-06f0cf4305b4bd90a   Ready    <none>   78m   v1.31.1-eks-1b3e656
And to see how it scales in the nodes, let’s see what happens when we scale down replicas in the deployment:
kubectl scale --replicas=5 deployment/retail-store-app-uiAnd checking after ca. 10 minutes we can see the following:

kubectl get nodes
NAME                  STATUS   ROLES    AGE   VERSION
i-013641a69e7d4e3f6   Ready    <none>   86m   v1.31.1-eks-1b3e656
i-06f0cf4305b4bd90a   Ready    <none>   86m   v1.31.1-eks-1b3e656
Cleanup
To clean everything up, so we don’t generate costs after trying this out, execute the following:
helm uninstall retail-store-app
kubectl delete pvc/data-retail-store-app-catalog-mysql-0
And we can interactively watch the progress:
kubectl get nodes --watch
NAME                  STATUS   ROLES    AGE    VERSION
i-013641a69e7d4e3f6   Ready    <none>   3h1m   v1.31.1-eks-1b3e656
i-06f0cf4305b4bd90a   Ready    <none>   3h1m   v1.31.1-eks-1b3e656
i-013641a69e7d4e3f6   Ready    <none>   3h1m   v1.31.1-eks-1b3e656
i-013641a69e7d4e3f6   Ready    <none>   3h1m   v1.31.1-eks-1b3e656
i-013641a69e7d4e3f6   Ready    <none>   3h1m   v1.31.1-eks-1b3e656
i-06f0cf4305b4bd90a   Ready    <none>   3h2m   v1.31.1-eks-1b3e656
i-013641a69e7d4e3f6   NotReady   <none>   3h2m   v1.31.1-eks-1b3e656
i-013641a69e7d4e3f6   NotReady   <none>   3h2m   v1.31.1-eks-1b3e656
i-013641a69e7d4e3f6   NotReady   <none>   3h2m   v1.31.1-eks-1b3e656
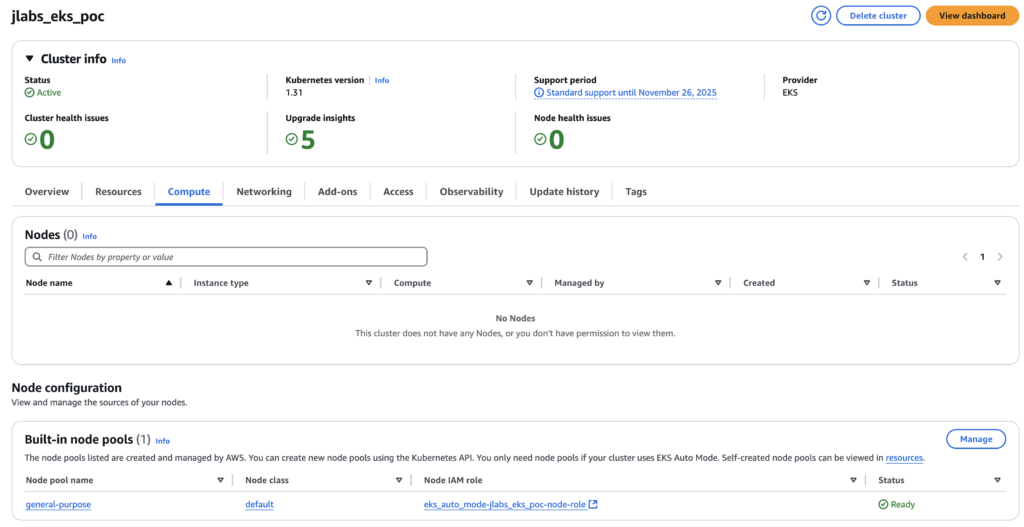
The output is not the best here, a bit glitchy, but we can see that the node becomes NotReady.
The AWS Console reflects that:

And when our nodes are reported as not ready, we can now remove the whole configuration with:
terraform destroy -auto-approveAnd our environment should be cleaned up and not incur any more costs.
Summary
The Amazon EKS Auto Mode is pretty simple to use and scales quickly and efficiently. Doing this PoC we could gain some confidence using it. I think that there’s great power with this new feature and that Kubernetes adoption will accelerate in many organizations with the EKS Auto Mode.
I remember working with a small team, where getting the EKS Cluster somewhat ready for staging deployments has taken us ca. 3 months. There were some other considerations, not related to the cluster itself, but I think that with the EKS Auto Mode we could have saved about 1 month of work of each member of the team.
And there’s no need to bother about the Karpenter configuration, which is non trivial and can be a deal breaker for someone with little to no Kubernetes experience – especially that Karpenter 1.0 was released 14th of August 2024.
The code I used here is available at J-Lab’s GitHub. The total AWS cost of this PoC was less than $2.
Meet the geek-tastic people, and allow us to amaze you with what it's like to work with j‑labs!
Contact us


